How to Enable the Compass Scheduler
Your scheduled reports and tasks won’t run until the Compass Scheduler is enabled. This is a one-time setup you do on the computer that will act as the “Master Scheduler.” That computer must stay powered on and awake at all times.
Important: Pick a computer that is always on (like a back-office PC or server). If it goes to sleep, loses power, or gets shut down, your scheduled tasks will stop running.
Step 1: Open Set Hosts
Section titled “Step 1: Open Set Hosts”On the computer you want to be the Master Scheduler:
- Click the Windows Start button
- Go to All Programs > Epicor Compass > Utilities > Set Hosts
The Host Configuration window will open. It has several tabs across the top:
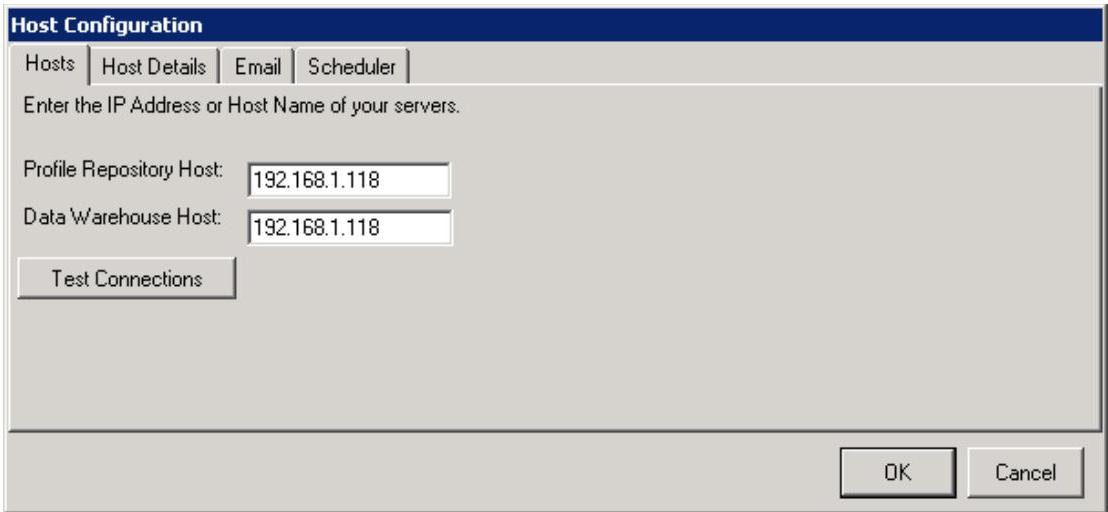
Don’t worry about the other tabs for now. The Hosts tab should already have your server IP addresses filled in. If it does, leave it alone and go straight to Step 2.
Step 2: Click the “Scheduler” Tab
Section titled “Step 2: Click the “Scheduler” Tab”Click the Scheduler tab at the top of the window. You’ll see this screen:
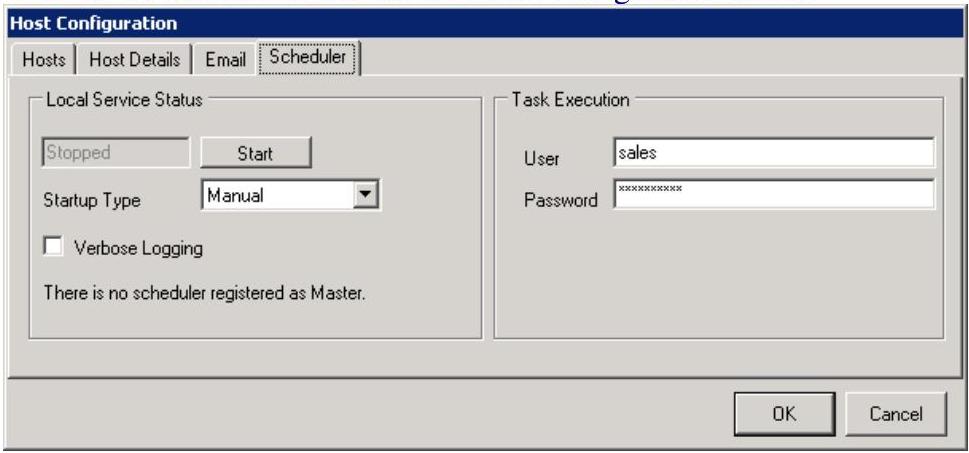
You’ll notice two sections:
- Left side — Local Service Status: This is where you start the scheduler.
- Right side — Task Execution: This is where you enter your Eagle login so the scheduler can run reports automatically.
Step 3: Enter Your Eagle User and Password
Section titled “Step 3: Enter Your Eagle User and Password”On the right side of the Scheduler tab, under Task Execution:
- User — Enter your Eagle username (the same one you use to log into Eagle)
- Password — Enter your Eagle password
This is NOT your email password. This is your Eagle system login. The scheduler needs this so it can log in automatically to run your reports. If you’re not sure what to enter, use whatever username and password you type when you sign into Eagle at the register or back-office terminal.
Tip: Many stores create a dedicated user called “COMPASS” in Eagle for this purpose, so the scheduler doesn’t break if someone changes their personal password.
Step 4: Set Startup Type to “Automatic”
Section titled “Step 4: Set Startup Type to “Automatic””On the left side, change the Startup Type dropdown from “Manual” to Automatic.
This ensures the scheduler will restart itself automatically if the computer reboots.
Step 5: Click “Start”
Section titled “Step 5: Click “Start””Click the Start button on the left side.
The screen should change to look like this:
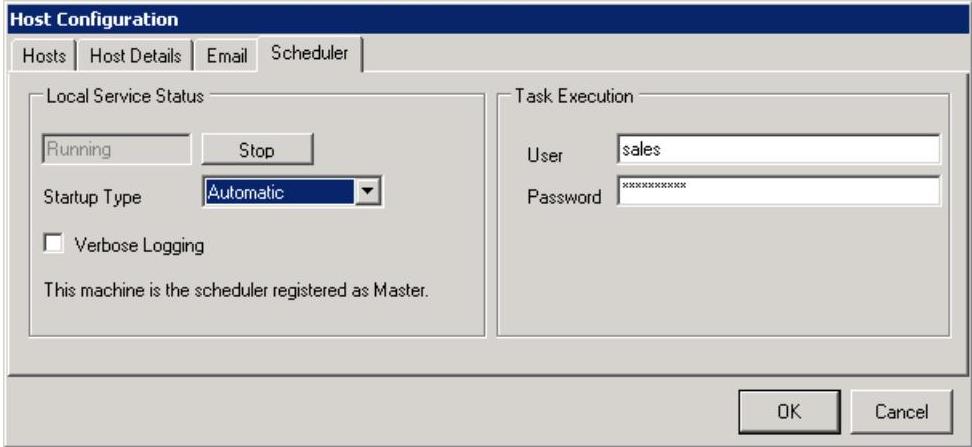
Confirm that you see:
- Service status says Running
- It says “This machine is the scheduler registered as Master”
Step 6: Click OK
Section titled “Step 6: Click OK”Click OK to save your settings.
You’ll see a confirmation message — click OK again to close it:

Close and reopen Compass for the changes to fully take effect.
What About the Email Tab?
Section titled “What About the Email Tab?”If your scheduled reports need to be emailed (for example, FastQuery sends reports via email), you’ll also need to configure the Email tab. You can do this now or come back to it later.
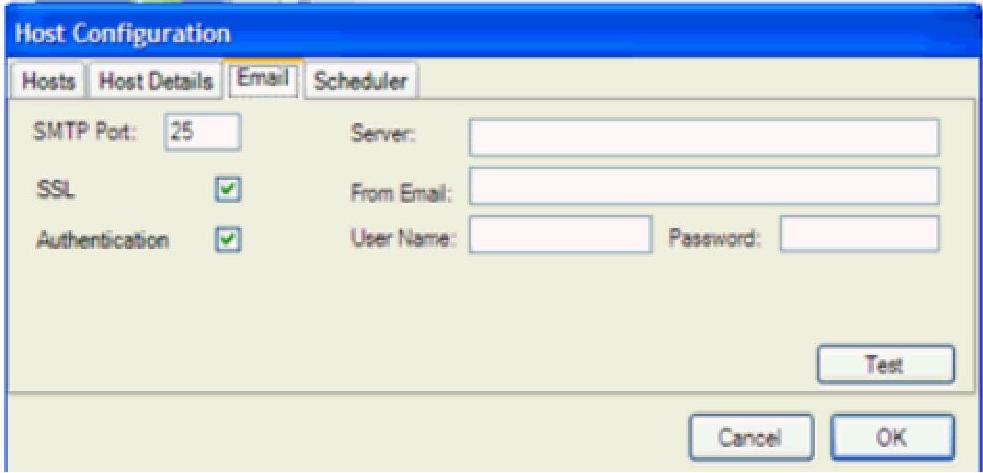
Here’s what to fill in:
| Field | What to Enter |
|---|---|
| SMTP Port | Usually 587 (or 25 if your provider requires it) |
| Server | Your email server address (e.g., smtp.gmail.com, smtp.office365.com, or whatever your email provider uses) |
| SSL | Check this box (most providers require it) |
| From Email | The email address reports will be sent from (e.g., reports@yourstore.com) |
| Authentication | Check this box if your email requires a login (most do) |
| User Name | The email account username (usually the full email address) |
| Password | The email account password |
Click Test to verify your settings. If you receive a test email, you’re good.
Not sure about your email settings? Ask whoever manages your store’s email (or your internet/email provider). Common setups:
- Gmail: Server
smtp.gmail.com, Port587, SSL on, Authentication on- Office 365 / Outlook: Server
smtp.office365.com, Port587, SSL on, Authentication onIf you don’t send reports by email, you can skip this tab entirely.
Quick Checklist
Section titled “Quick Checklist”- Opened Set Hosts from Epicor Compass > Utilities
- Went to the Scheduler tab
- Entered Eagle User and Password under Task Execution
- Set Startup Type to Automatic
- Clicked Start — status shows “Running” and “registered as Master”
- Clicked OK to save
- (Optional) Configured the Email tab if reports need to be emailed
- Computer is set to never sleep and stays powered on