

Counting Tasks

A count is something any task can carry: a list of products with expected quantities and a built-in barcode scanner, making it easy to count what’s on the shelf and spot discrepancies. A task that includes a count is what we call a counting task — you can create one from scratch, or add a count to a task that already exists.
flowchart LR
    A["Open\nTask"] --> B["Walk to\nBin"]
    B --> C["Scan\nBarcode"]
    C --> D["Enter\nCount"]
    D --> E{"More\nItems?"}
    E -->|Yes| B
    E -->|No| F["Submit\nCounts"]

How Counting Tasks Work
Section titled “How Counting Tasks Work”A counting task contains a list of products, each with an expected quantity. Your job is to physically count the items on the shelf and record what you find. FastQuery compares your count to the expected quantity and highlights any discrepancies.
Performing a Count
Section titled “Performing a Count”- Open the counting task from your My tab
- The counting interface shows the list of products to count
- Use the barcode scanner to scan each item — the app automatically records your count
- Swipe through items to move to the next product
- When you’ve counted everything, finalize the count to generate a report
On a Zebra handheld, you can pull the device’s hardware trigger instead of using the camera — the scan behaves exactly the same. If you scan an item that isn’t on the count list, you’ll hear a miss tone and get a tappable prompt to add it to the count (or the app adds it on its own — see Add scanned items below). See Zebra Handheld Scanners.
Scan Settings
Section titled “Scan Settings”Open the toolbar menu on the count list and tap Settings to choose what a scan does. Each setting is explained on the screen, and your choices stay on the device until you log out.
- First scan counts as — what the first scan of an item records. Nothing (the default) just shows the item so you can type the quantity. Counted as 0 records zero, so you can walk a section and scan every shelf tag to confirm what is gone. Counted as 1 records one unit, so a single scan confirms one on the shelf. The setting applies only to an item’s first scan: later scans of the same item bring it into view and leave the count alone, so enter the rest of the quantity by hand. An item that already has a count is never overwritten.
- Add scanned items — when it is on, scanning a product that isn’t on the count list adds it to the list right away, without the “Not on the list” prompt, and records the first-scan quantity above. Use it for a full physical inventory where anything you find belongs in the count. Leave it off for a targeted count so a stray scan doesn’t grow the list.
- Images on right — moves the product photos to the right edge of the list.
The same settings apply on the item list and while swiping through items one at a time. In a finalized batch, scanning never adds an item.
Narrowing the List for a Recount
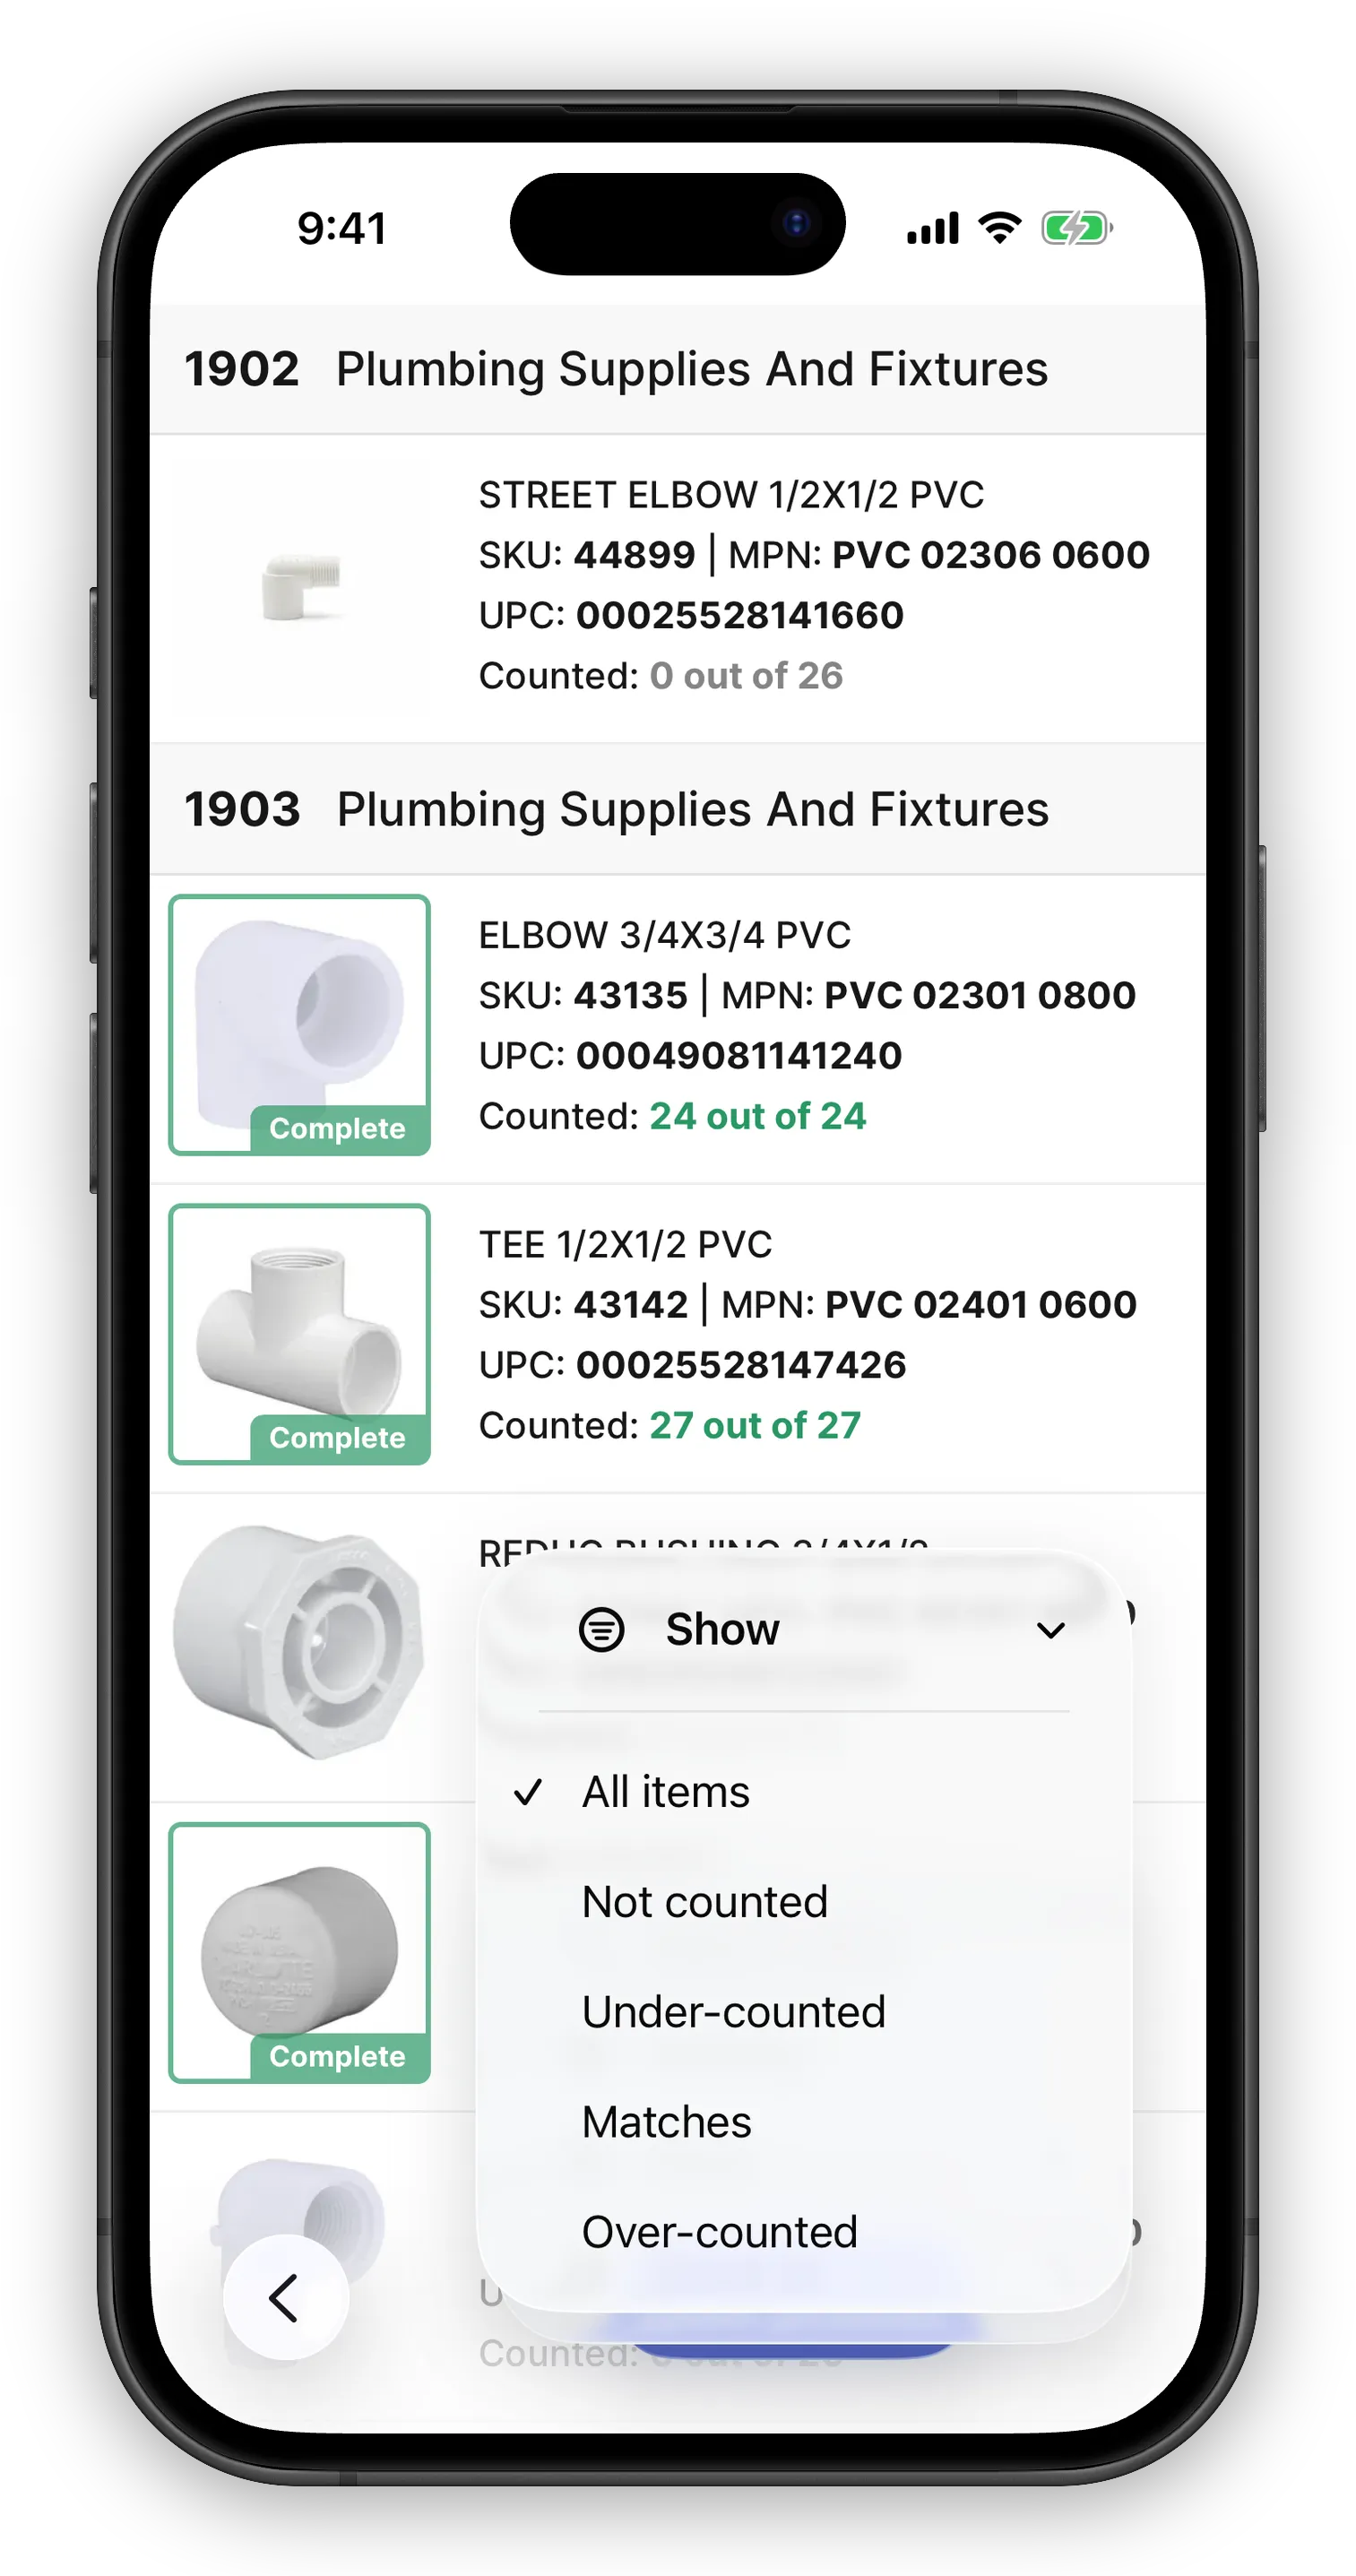
Section titled “Narrowing the List for a Recount”Open the toolbar menu on the count list and tap Show to see only the items of one status: Not counted, Under-counted, Matches, or Over-counted. The list keeps its bin order, so a recount pass still follows the aisles, and swiping through items one at a time stays within the narrowed list. An item you count stays on the list with its new color, so you can see what you have done, and an item you scan or search for joins the list if it was hidden. To refresh the list to the current statuses, choose the same option again or pull down to refresh. The choice lasts until you leave the task; the next visit shows every item again. On Android, the option sits under its own filter button next to the toolbar menu.
On the web task page, the count grid has a Variance column (units over or under the expected quantity) and a Variance $ column (that difference at the store’s retail price). Each column header’s menu sorts and filters the grid, so a manager can list the uncounted items or the differences that move the books.
Counts Follow Sales Until You Finalize
Section titled “Counts Follow Sales Until You Finalize”A count records how many units you found. When you finalize, the adjustment file doesn’t set inventory to that number — it applies the difference between your count and the expected quantity to the inventory as it stands at that moment. So a sale that happens between your count and the finalize is not lost: if you counted 10 against an expected 12, and 2 sold in the meantime, the file takes inventory from 10 to 8, which is what’s on the shelf. The list keeps showing that count as “10 out of 12”: the expected figure on a counted item is the quantity at the time of your count, not the live one, so a sale after the count doesn’t turn a match into a discrepancy.
This makes a pre-count possible: count the backstock or a slow section days ahead of a physical inventory, keep selling as usual, and finalize everything on the day. You can also hand the assistant a pre-count sheet — a list of SKUs with the quantities you already counted — and it creates the task with those counts filled in (see From the AI Assistant).
One thing to avoid: importing a batch’s adjustment file and then re-finalizing the same batch. The re-finalize reads inventory after the import, applies the difference again, and produces a file that would move inventory twice. Re-finalize a batch only when its earlier file was never imported.
When a Barcode Isn’t in the Catalog
Section titled “When a Barcode Isn’t in the Catalog”Once in a while you’ll scan an item whose barcode isn’t in the system at all — the app says “Item not found in catalog.” You can still count it by looking it up manually: open the search from the counting screen and type the item’s SKU or a few words of its description. Along with any matches from the count list, the app shows matching products from your store’s full inventory under a Full inventory heading; tap the right one, then tap it again to confirm, and it joins the count list. Note that the barcode itself still isn’t linked to the product, so scanning it again won’t register — enter the quantity by hand on the item’s counting screen.
Understanding the Color Indicators
Section titled “Understanding the Color Indicators”As you count, color-coded indicators help you see your progress at a glance:
- Green — Your count matches the expected quantity. You’re all set.
- Orange — The item hasn’t been counted yet, or the count is below the expected quantity. Keep counting.
- Blue — The item has been counted to zero.
- Red — Your count is higher than expected. Double-check for errors or misplaced items.
Navigation
Section titled “Navigation”Items in a counting task are sorted by bin, making it easy to work through your count aisle by aisle. This way you can walk the store in a logical order instead of jumping around.
Creating Counting Tasks
Section titled “Creating Counting Tasks”There are several ways counting tasks can be created:
From Inventory Selection (Web App)
Section titled “From Inventory Selection (Web App)”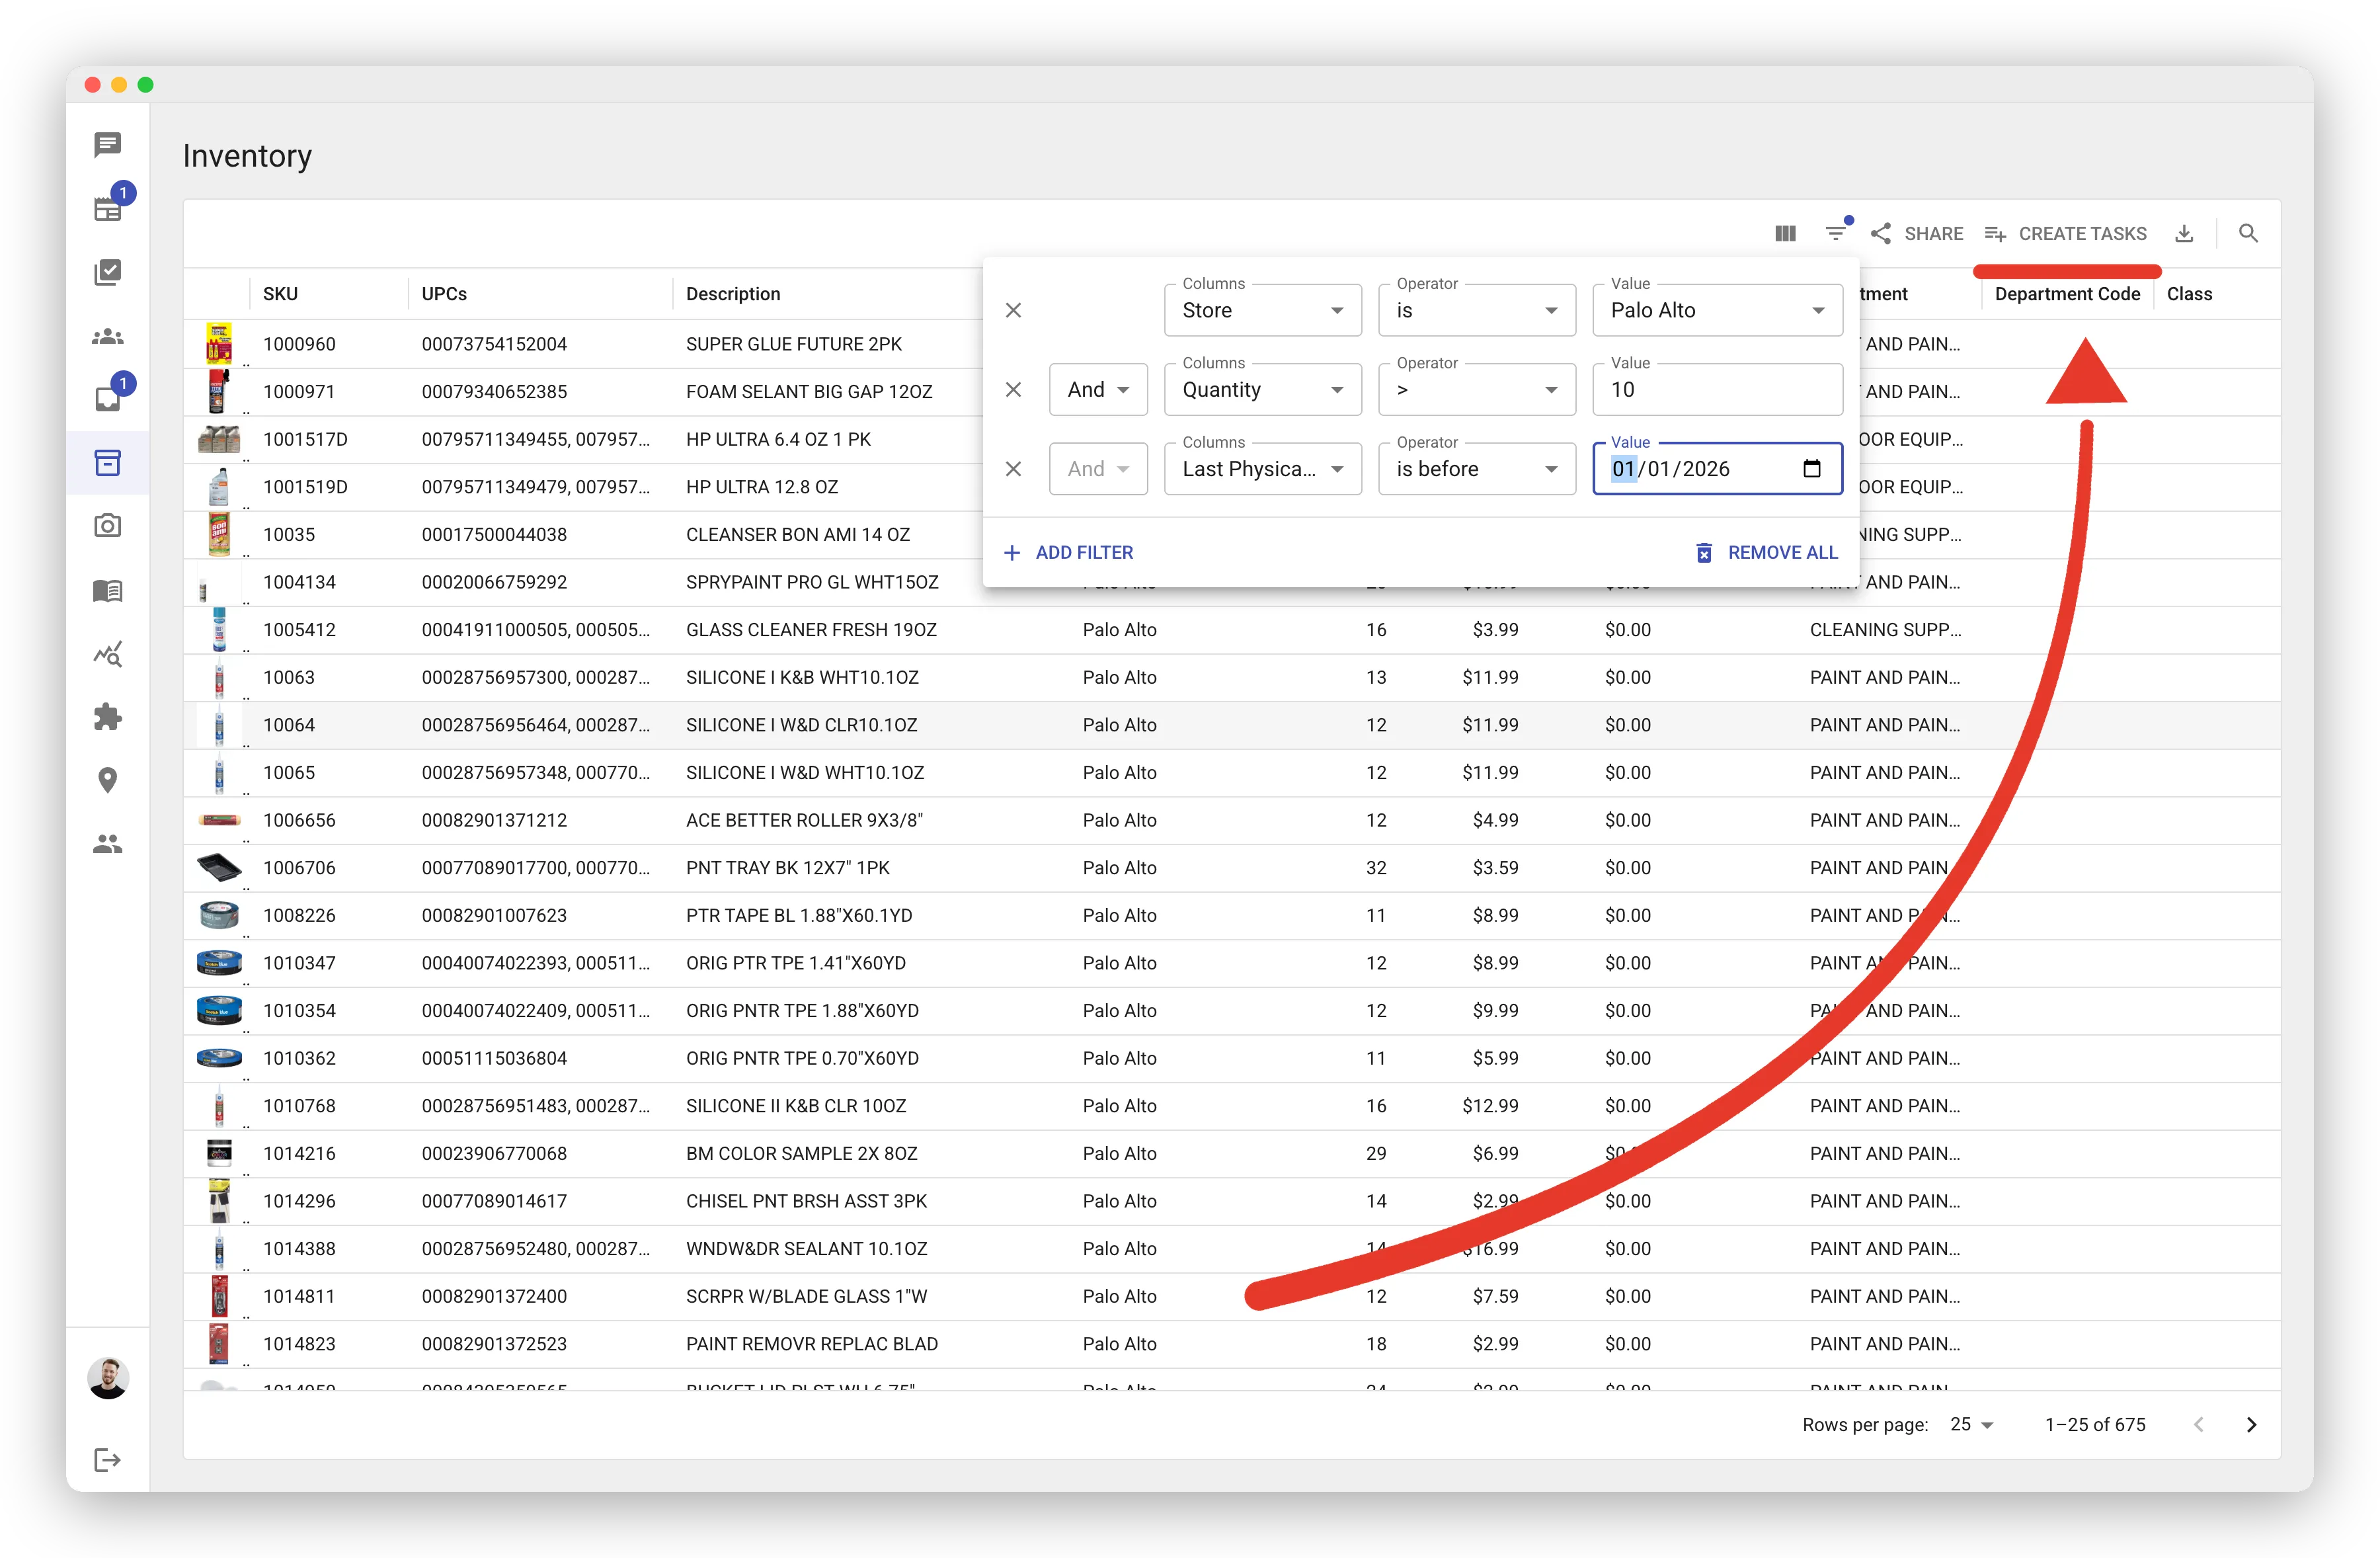
- Open the inventory grid in the web app
- Apply filters to narrow down what you want to count — for example:
- One aisle or shelf — filter by bin
- A category or department — filter by category
- A brand or supplier — filter by manufacturer or supplier
- Click Create Tasks in the toolbar and choose counting tasks
- The task is created with the filtered products and their expected quantities. This is bulk task creation — large selections are automatically grouped by store and split into multiple tasks along bin (shelf location) lines, targeting the Items per task size you choose (1,000 by default, adjustable from 25 to 20,000) while always keeping the items on a shelf together in one task. So a large department or fineline becomes several manageable tasks rather than one oversized one. Up to 35,000 items can be turned into tasks at once.
Creating tasks from the inventory grid is available to anyone who can manage tasks at that facility — admins everywhere, managers at their assigned facilities, and regular users at their home facility (see Roles and Permissions).
From the AI Assistant
Section titled “From the AI Assistant”You can also ask the AI to set up a count in plain language — for example, “Create a counting task for aisle 5” or “Have someone count the paint display.” The AI drafts the task and asks you to confirm before creating it.
If you already counted part of the list — say, the backstock on a sheet of paper or in a spreadsheet — paste the SKUs with their quantities and ask for a counting task. The items you give a quantity for start counted; the rest wait for the scan. The store then keeps counting from there and finalizes once (see Counts Follow Sales Until You Finalize).
Automatic Creation from Shelf Scanning
Section titled “Automatic Creation from Shelf Scanning”If your store uses Zippedi or Badger shelf-scanning robots, counting tasks can be created automatically when the robot detects discrepancies between what’s on the shelf and what’s expected. This lets your team focus on verifying and resolving issues rather than finding them.
From POS Discrepancy Reports
Section titled “From POS Discrepancy Reports”When your point-of-sale system flags inventory discrepancies — for example, an item that sold but shows zero stock — counting tasks can be generated to verify the actual quantities on the shelf.
Finalizing a Count
Section titled “Finalizing a Count”When you’re ready, tap Finalize to close out the items you’ve counted so far. This:
- Records those counts and locks the items against further edits
- Generates a summary report showing matches and discrepancies
- Emails the report to the addresses you choose — including an adjustment file formatted for your POS system, so the corrected quantities can be imported instead of retyped. Epicor Eagle stores get a PIP file (see Importing PIP Files); Acceo stores get a fixed-width TXT file ready for Acceo’s import; Paladin stores get a CSV of SKUs and new quantities.
You don’t have to count everything before finalizing — untouched items stay open in the same task, and you can finalize again in another round once they’re counted. Finalizing never completes the task: mark it done whenever the work is finished, even with items left uncounted.
Finalizing Only the Small Differences
Section titled “Finalizing Only the Small Differences”On a large count you may want the clean matches and small differences to go out now, and the big surprises to get a recount first. Tap the sliders button in the top-right corner of the finalize screen to show the variance limit:
- Max difference in units — finalize only the counted items whose count is within this many units of the expected quantity. Enter 0 to finalize the exact matches only.
- Max difference in dollars — the unit difference times the item’s retail price must be within this amount. An item with a difference but no retail price never passes this limit.
The screen shows how many counted items are within the limit, and the button finalizes only those. The items over the limit keep their counts and stay open in the task, so you can recount them and finalize them in a later round. The limit applies to the round you are finalizing now and is forgotten afterwards; the next finalize starts with no limit.
Once a count is finalized, you can also bulk-print fresh price tags for every item in the count — useful after a section reset or pricing change. See Label Printing.